Geedew - Blogging about the web.JavaScript 2020, technology and the web2020-02-03T14:20:58.496Zhttps://geedew.com/Drew WilsonHexoWeek 5 Reading Rounduphttps://geedew.com/Week-5-Reading-Roundup/2020-02-03T14:20:58.000Z2020-02-03T14:20:58.496ZThis week was very light on the reading. Much work getting done and a lot of distractions. However, quality over quantity for sure.
I’ve gone through much of this already. The three steps to what is described as a Strategic Architectural Initiative is nice, but feels like very shallow advice. Hoping to read more on this topic to understand the details. May be useful.
Career Growth Frameworks in Software Engineering: A Review
A line from “Evolutionary Architecture” by Neal Ford, Rebecca Parsons and Patrick Kua comes to mind, “The more reusable something is, the less usable it is.”
In contrast to the Peter principle, which assumed promotions were granted out of a genuine desire to recognize and reward performance, we have the Dilbert Principle. Coined in the mid 90’s, it supposes that promoting the incompetent into management is the most effective way to get them out of the way of the people who do the ‘real work’. I.e — the developers and software engineers.
Tell me how you measure me, and I will tell you how I will behave. — Eliyahu M. Goldratt
This post is filled with valuable information. It validates a lot of the feelings I have faced in roles and companies. In retrospect, I know that I probably pushed for the traditional hierarchy when in a flat role structure. An implicit flat structure is an issue and it always needs to be explicit. This article provides an immense resource for all readers
This is some important news that make change a lot of the behaviors online. For instance, it’s quite possible that many sites will take the approach of setting up logins to get access to the page data.
This is definitely in a V1 mode. The setup was easy, but getting detailed information from it seems very simple. I’m not sure it’s in a usable form at this point. However, maybe in the coming years it will become the go-to tool.
]]>
<p>This week was very light on the reading. Much work getting done and a lot of distractions. However, quality over quantity for sure.<br>
Deploying Hexo with Rsync over SSH on WSLhttps://geedew.com/creating-a-hexo-rsync-deploy/2020-02-01T13:35:49.000Z2020-02-02T21:38:16.624ZThis is a hexo driven blog. For the last few years, the deployment has been something that has been done in Docker with Gitlab CI integration. However, my Gitlab setup has been having aggravating issues with its base operating system (Catalina…). So in the mean time I had to fall back on something I’ve used since nearly Day 0 in my web development. I remember when I was using FTP in the last 90s to upload content to a website and having read up on Rysnc. It was so different that it felt impossible. However, it has easily become the workhorse tool over the years. So of course with all the great experiences it makes sense do deploy with Rsync. Hexo provides a plugin architecture that can be used to extend the framework including deployments. Luckily there is already an extension for Rsync deployments so no need to invent some scripts.
With that, defining the _config.yml couldn’t be easier.
1
2
3
4
5
6
7
8
9
10
11
12
13
14
15
16
17
deploy: type:rsync# This is what we are going to talk about host:geedew.com# Where to SSH to user:DEPLOYMENT_USER# This is the user to SSH with root:PATH_TO_REMOTE_DIRECTORY# This is the path the files are served from port:22# SSL! # Custom args can be passed # `--chown` is important. The files need to owned by the users that is hosting them. # This is the user that owns the HTTP process, the nginx processes in my case. # `--chmod` is to set the correct permissions. Most importantly removing the # write permissions that the files do not need to have. args:--chown=USER:GROUP--chmod=g-w,o-w # Delete what is existing. I use Git to keep all versions of my files so # I don't mind it wiping the remote files. delete:true verbose:true ignore_errors:false
]]>
<p>This is a hexo driven blog. For the last few years, the deployment has been something that has been done in <a href="https://www.docker.com/" target="_blank" rel="noopener">Docker</a> with <a href="https://about.gitlab.com/product/continuous-integration/" target="_blank" rel="noopener">Gitlab CI</a> integration. However, my Gitlab setup has been having aggravating issues with its base operating system (<a href="https://www.theregister.co.uk/2019/10/11/macos_catalina_fail/" target="_blank" rel="noopener">Catalina…</a>). So in the mean time I had to fall back on something I’ve used since nearly Day 0 in my web development. I remember when I was using <a href="https://en.wikipedia.org/wiki/File_Transfer_Protocol" target="_blank" rel="noopener">FTP</a> in the last 90s to upload content to a website and having read up on <a href="https://linux.die.net/man/1/rsync" target="_blank" rel="noopener">Rysnc</a>. It was so different that it felt impossible. However, it has easily become the workhorse tool over the years.<br>
Week 4 Reading Rounduphttps://geedew.com/Week-4-Reading-Roundup/2020-01-28T13:20:55.000Z2020-01-28T13:20:55.995ZEach week I find myself reading a lot of interesting articles online. This is from many valuable sources that I have followed. This post is a roundup of what I have read this week and anything that I have taken away from the material I found valuable.
Performance testing HTTP/1.1 vs HTTP/2 vs HTTP/2 + Server Push for REST APIs
A very in-depth difference and trade-offs of the http/2 and even http/3. The tests really inspire learning more about how each spec changes the way the browser works and operates. I expect to come back to this often as a refresher.
Helping Browsers Optimize With The CSS Contain Property
Contain really seems magical. Almost one of those ideas that are obvious in hindsight. Why has it taken so long to get something like this! I’m looking forward to using contain in most if not all of my future work. Especially that it will contain the z-index. That solves many issues. Now it begs the question, How can I break the containment on demand?!
Finally a CSS Only Solution to Hover on Touchscreens
I have to say that I’ve never encountered the ‘sticky hover’ myself. In fact, I’m more used to having the issue of zero hover occurring since the touchscreen has no idea that my finger is hovering! However, I’m all for more media tags to help solve the issue. Even though this is not fully implemented yet, the solution is simple, @media(hover: hover) and (pointer: fine) {}.
A really cool breakdown of HTTP and how they should be handle via a visual state diagram. Kept up to date with pull requests none the less! Now someone just needs to sell these as posters.
Learning this lesson can take some many years. I think that the author comes to their conclusion in a well thought out way. However, this is something that will need reminding for years to come, especially when you have to ‘teach’ this lesson to a team member that insists on changes that really are semantic and subjective.
How Shopify Manages API Versioning and Breaking Changes
I think that I have read and reread this at least a few times in the past week. It’s very impactful and helpful to what I do. These models and the thinking behind them really give someone the edge, assuming that you practice them.
This is really impactful and gives a lot of clarity to the situations I myself have been in. I would expect this rule to be near the top of the list of what needs to be challenged in any software company. Imagine if this behavior was acceptable in anything that could harm someone, like rockets, jets or military equipment!
]]>
<p>Each week I find myself reading a lot of interesting articles online. This is from many valuable sources that I have followed. This post is a roundup of what I have read this week and anything that I have taken away from the material I found valuable.<br>
Upgrading LetsEncrypt Certificates for Ghosthttps://geedew.com/Upgrading-LetsEncrypt-Certificates-for-Ghost/2020-01-02T21:41:55.000Z2020-01-03T23:41:56.923ZA self-hosted Ghost blog can and should be using HTTPS encryption. One of the nice things about Ghost is that it automates the management of the certificates needed for HTTPS by using LetsEncrypt. However, recent updates in the last year have broken this automation.
Luckily there is an easy fix to make sure that not only are the certificates still valid and but also the site is using latest versions of the update software.
Updating the Certificates
To get right to it, here are the all the steps to take. This assumes that Ghost is installed on a Debian based system (Ubuntu for instance) and that Ghost CLI is installed and in use (This is the default when installing Ghost).
# Login as the user Ghost is running as (cat /etc/group and browse for the ghost user)
# or just be root, if the user was root, by adding `sudo` in front of the commands. In most cases it will be 'ghost'
su ghost

# Verify your Ghost site is using LetsEncrypt still
# Your site should be listed here
/etc/letsencrypt/acme.sh --home "/etc/letsencrypt" --list

# Attempt to get a new certificate. Note THIS should error if the above issue in automation is occurring. Replace YOUR_DOMAIN.COM with, well, your domain.
/etc/letsencrypt/acme.sh --home "/etc/letsencrypt" --renew -d YOUR_DOMAIN.COM

# Assuming that had an error, you likely need the latest 'acme' tool!
/etc/letsencrypt/acme.sh --upgrade --home "/etc/letsencrypt"

# Should finish with
#[XXXXXXX] Install success!
#[XXXXXXX] Upgrade success!

# Now upgrade with Success this time!
/etc/letsencrypt/acme.sh --home "/etc/letsencrypt" --renew -d YOUR_DOMAIN.COM
What we’ve done above is update the LetsEncrypt ACME tool to the latest version which contains the new API for keeping the certificate up to date. From this point forward, the site should stay encrypted!
]]>
<p>A self-hosted <a href="https://ghost.org/" target="_blank" rel="noopener">Ghost blog</a> can and should be using HTTPS encryption. One of the nice things about Ghost is that it automates the management of the certificates needed for <a href="https://www.cloudflare.com/learning/ssl/what-is-https/" target="_blank" rel="noopener">HTTPS</a> by using <a href="https://letsencrypt.org/" target="_blank" rel="noopener">LetsEncrypt</a>. <a href="https://community.letsencrypt.org/t/new-cdn-for-the-production-api/102629" target="_blank" rel="noopener">However, recent updates in the last year have broken this automation</a>. </p>
<p><img src="/Ugrading-LetsEncrypt-Certificates-for-Ghost/expired-ssl.png" alt="Running into this means seeing a dreaded 'This site is not who they say they are' page! "></p>
<p>Luckily there is an easy fix to make sure that not only are the certificates still valid and but also the site is using latest versions of the update software.</p>
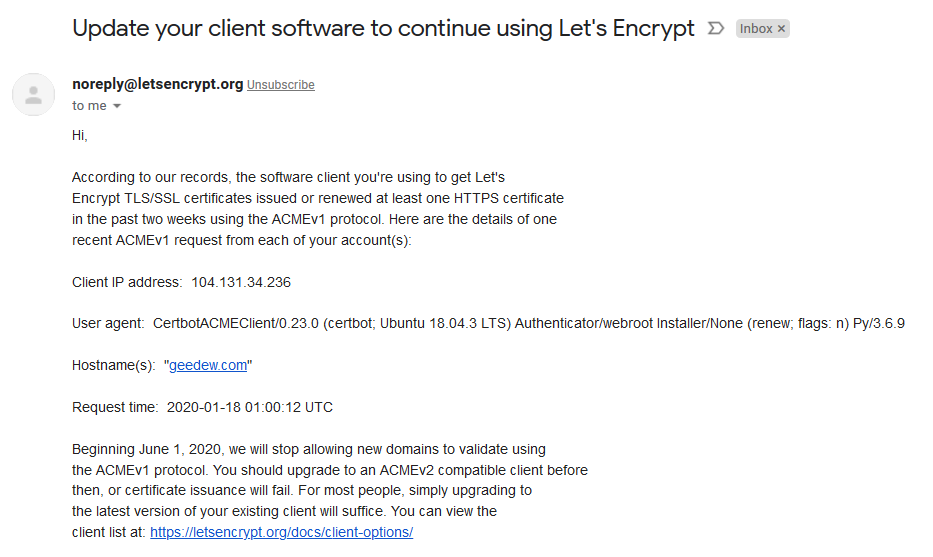
Updating Certbot on Ubuntu for ACMEv2 Upgradeshttps://geedew.com/updating-certbot-on-ubuntu/2019-11-01T08:16:42.000Z2020-02-01T17:31:18.323ZWhat to do when you get this email
You may have seen this message.
If the services you are using are not using certbot then it’s unlikely the rest will help fix this issue. What you should see with the command below is that the version that is installed is less than the candidate version. This means that it’s important to move to the latest version. Ubuntu has a latest version at the time of this recording of 0.27.0### while a service in use from the last couple of years may have the 0.23.0### version (like in the output below). Getting the latest version will also push the services onto the latest ACME v2 protocol.
- - - - - - - - - - - - - - - - - - - - - - - - - - - - - - - - - - - - - - - - ** DRY RUN: simulating 'certbot renew' close to cert expiry ** (The test certificates below have not been saved.)
Congratulations, all renewals succeeded. The following certs have been renewed: /etc/letsencrypt/live/geedew.com/fullchain.pem (success) ** DRY RUN: simulating 'certbot renew' close to cert expiry ** (The test certificates above have not been saved.) - - - - - - - - - - - - - - - - - - - - - - - - - - - - - - - - - - - - - - - -
IMPORTANT NOTES: - Your account credentials have been saved in your Certbot configuration directory at /etc/letsencrypt. You should make a secure backup of this folder now. This configuration directory will also contain certificates and private keys obtained by Certbot so making regular backups of this folder is ideal.
Success! At this point the domain should be all up to date with the latest ACMEv2 protocol.
]]>
<h1 id="What-to-do-when-you-get-this-email"><a href="#What-to-do-when-you-get-this-email" class="headerlink" title="What to do when you get this email"></a>What to do when you get this email</h1><p>You may have seen this message.<br><img src="/updating-certbot-on-ubuntu/certbot-email.png" alt="An email from LetsEncrypt showing that a current certbot in use is using the out of date ACMEv1 protocol and needs to be updated."></p>
<p>If the services you are using are not using <a href="https://certbot.eff.org/" target="_blank" rel="noopener">certbot</a> then it’s unlikely the rest will help fix this issue. What you should see with the command below is that the version that is installed is less than the candidate version. This means that it’s important to move to the latest version. Ubuntu has a latest version at the time of this recording of 0.27.0### while a service in use from the last couple of years may have the 0.23.0### version (like in the output below). Getting the latest version will also push the services onto the latest <a href="https://ietf-wg-acme.github.io/acme/draft-ietf-acme-acme.html" target="_blank" rel="noopener">ACME v2</a> protocol. </p>
Catching Property Validation in Vue with Jesthttps://geedew.com/catching-prop-validation-in-vue-with-Jest/2019-03-04T15:00:00.000Z2020-01-02T19:30:52.513ZI ran into an interesting problem. I encountered a having to test a component that didn’t have a required property set. This then throws an error and it’s not obvious as to how to test this.
After some searches, I’ve found that there really is only one effective way to test this if Vue will throw an error. Arguably though, we would only be testing that Vue is doing what you tell it to be doing (not testing that we wrote a requirement on the property).
But if you follow This Resource, it’s possilbe to instead, test that there is a ‘required’ attribute test on the props object. So now, instead of testing if Vue works, it will be testing that the code has the required feature! Much better than checking for errors.
]]>
<p>I ran into an interesting problem. I encountered a having to test a component that didn’t have a required property set. This then throws an error and it’s not obvious as to how to test this. </p>
<figure class="highlight bash"><table><tr><td class="gutter"><pre><span class="line">1</span><br><span class="line">2</span><br><span class="line">3</span><br><span class="line">4</span><br><span class="line">5</span><br><span class="line">6</span><br><span class="line">7</span><br></pre></td><td class="code"><pre><span class="line">console.error node_modules/jest-mock/build/index.js:711</span><br><span class="line"> [Vue warn]: Missing required prop: <span class="string">"tasks"</span></span><br><span class="line"></span><br><span class="line"> found <span class="keyword">in</span></span><br><span class="line"></span><br><span class="line"> ---> <Anonymous></span><br><span class="line"> <Root></span><br></pre></td></tr></table></figure>
What does unsafe-perm in npm actually do?https://geedew.com/What-does-unsafe-perm-in-npm-actually-do/2018-09-20T19:37:49.000Z2020-01-02T19:30:52.465ZI’ve routinely been directed to what feels like a magic fix to issues when installing items over NPM. The issue that I’ve most recently encountered occurs in two different OS’s; Windows and Elementary. When attempting to install Sindre Sorhus’ Pure ZSH theme both in Ubuntu WSL and Elementary Loki, I have issues with not having permissions.
The solution seems to be almost the same in both cases.
1
$> npm config set unsafe-perm true
What exactly is this doing? Is it ‘unsafe’?
Let’s start with a search. So there is a config setting allowed in the package.json that actually can set this per package. But wait, it’s always true unless using root. I never run as root, or with sudo privileges unless I am forced to. Let’s take a look through the source code
Set to true to suppress the UID/GID switching when running package scripts. If set explicitly to false, then installing as a non-root user will fail.
If npm was invoked with root privileges, then it will change the uid to the user account or uid specified by the user config, which defaults to nobody. Set the unsafe-perm flag to run scripts with root privileges.
1 2 3 4 5 6 7 8 9
functionloadUid(cb) { // if we're not in unsafe-perm mode, then figure out who // to run stuff as. Do this first, to support `npm update npm -g` if (!this.get('unsafe-perm')) { getUid(this.get('user'), this.get('group'), cb); } else { process.nextTick(cb); } }
In other words, if we set unsafe-perm to always true, we will stop getting the user and the group the command was ran as and we will over-load the defaults.
It’s starting to make a bit more sense. This issue that I’m facing is that the permissions my current user has are unable to create the symlinks that are being asked by the program. By setting unsafe-perm to true will force NPM to attempt to always run within the context of the running script.
I suppose that this isn’t ‘unsafe’ but it does force the package installer to never drop into user and group switching when installing apps. It’s possible then you may end up having the code run as ‘root’ when installing (which could then be considered ‘unsafe’);
If someone really wants to encourage this all the time, then they can do npm config set unsafe-perm false explicitly.
In the npm 1.0 future, it will probably require sudo for global installing no matter what, and use this behavior for local installing. Since so many people have npm installing in their home dir, requiring sudo is causing more trouble than it’s worth.
Boom
This was added to help installing files into ‘safe’ locations without sudo. So I think that I may have the answer?
Use this sparingly; probably bad to set globally for all running scripts. If the user is running as root it may cause the app to force changes that could extend beyond what a running script should have. Never run as root and it will be true by default. Use sudo otherwise. It’s not a magic bullet.
]]>
<p>I’ve routinely been directed to what feels like a magic fix to issues when installing items over NPM. The issue that I’ve most recently encountered occurs in two different OS’s; Windows and Elementary. When attempting to install <a href="https://github.com/sindresorhus/pure" target="_blank" rel="noopener">Sindre Sorhus’ Pure ZSH theme</a> both in Ubuntu WSL and Elementary Loki, I have issues with not having permissions.</p>
<p>The solution seems to be almost the same in both cases.</p>
<figure class="highlight sh"><table><tr><td class="gutter"><pre><span class="line">1</span><br></pre></td><td class="code"><pre><span class="line">$> npm config <span class="built_in">set</span> unsafe-perm <span class="literal">true</span></span><br></pre></td></tr></table></figure>
<p>What exactly is this doing? Is it ‘unsafe’?</p>
Creating a Sticky Header with Bulma CSShttps://geedew.com/Creating-a-Sticy-Header-with-Bulma-CSS/2018-08-01T08:16:42.000Z2020-01-02T19:30:52.444ZBulma CSS is a library that uses the flex standard to create modern layouts. One thing that is does well is to allow extension of the library by defining some common rules to follow. A pattern that happens quite a bit is to have a ‘footer’ of content that is at the bottom of a page no matter how little content is on the page but will scroll below the content if there is more than one screen’s worth.
Some calls this a ‘sticky’ footer (not to be confused with ‘fixed’).
The easiest solution is to use flex box by wrapping the page with a ‘tall’ container. We can use the body or some div.
Define a class that will cause whatever element to take up as much space as possible.
]]>
<p><a href="https://bulma.io/" target="_blank" rel="noopener">Bulma CSS</a> is a library that uses the <a href="https://developer.mozilla.org/en-US/docs/Web/CSS/flex" target="_blank" rel="noopener">flex standard</a> to create modern layouts. One thing that is does well is to allow extension of the library by defining some common rules to follow. A pattern that happens quite a bit is to have a ‘footer’ of content that is at the bottom of a page no matter how little content is on the page but will scroll below the content if there is more than one screen’s worth.</p>
<p>Some calls this a ‘sticky’ footer (not to be confused with ‘fixed’).</p>
Creating a basic interface pattern in NodeJShttps://geedew.com/basic-interfaces-in-nodejs/2018-07-13T14:33:42.000Z2020-01-02T19:30:52.495ZThe interface pattern is rarely understood and almost never used in JavaScript. On a large project or in a big team, interfaces provide a critical abstraction and the maintaining and use of them is something that Architects or Lead will focus on as a tool to keep code quality known and functionality expected. JavaScript does not yet have this basic functionality as it’s not an Object Oriented Programming language. Instead, it leans and most code in the wild is leaning, toward the Functional Programming behaviors of JavaScript. Interface patterns are still useful and it’s fairly easy to created something in JavaScript that contains the proper abstractions to benefit the code that helps a project.
Let’s begin with the ‘why’. The need to interface patterns, as stated above, may come from technical leads as a tool to form the code to what they expect to be common. More formally, interfaces provide a blueprint to a common API between two code bases. A few better definitions can be found on Stack Overflow. Interfaces are the abstraction of the structure of a class, not the definition of. Using them ‘guarantees’ the object will contain the interface requirements. Many places in code, especially in JavaScript, undefined checks are required. LoDash’s get method is one great method that makes this for the code in a common pattern. These checks bleed into software and make changing the software hard.
“Do we have this method and if so, use it”. “Does the data contain this object, else give an empty array”.
If the structure of the data or object change, these safeguards must all be updated. Worse still, they can not be added and the page may error out. Interface pattern is one of the best tools to counter this. A not so hard to use example is taking advantage of the extends property in classes. In this case we want to create a Menu, but we want to make sure that all of our Menu’s have the same method to get the items. Each menu however will have their own items and we will write many tests assuming the getItems exist. We must make sure all menu’s have this method, else we have to safeguard within all uses.
classMenuextendsMenuInterface{ // no items } exportdefaultnew Menu() // Error "Menu's must have items!"
// ---
// file baseMenu.js classBaseMenuextendsMenuInterface{ constructor() { super(); this.items = []; } get getItems() { return items; } } exportdefaultnew BaseMenu(); // No Error, has the method!
In a way, we have provided a ‘forced structure’ of the Menu. This is the basic interface pattern that solves one of those major issues of safeguarding. We know that baseMenu.getItems() will exist and not fail. Further, we can use flow or typescript to guarantee the return types on the methods. More JavaScript engineers should take advantage of the patterns, like interfaces, that provide proven abstractions to problems being solved. They free the code and the developer to think about the logic, not every little implementation detail by positioning the behaviors of the code into well organized and easily understood logic.
]]>
<p>The <code>interface</code> pattern is rarely understood and almost never used in JavaScript. On a large project or in a big team, <code>interfaces</code> provide a critical abstraction and the maintaining and use of them is something that Architects or Lead will focus on as a tool to keep code quality known and functionality expected. JavaScript does not yet have this basic functionality as it’s not an Object Oriented Programming language. Instead, it leans and most code in the wild is leaning, toward the Functional Programming behaviors of JavaScript. <code>Interface</code> patterns are still useful and it’s fairly easy to created something in JavaScript that contains the proper abstractions to benefit the code that helps a project.</p>
Sharing SSH With WSLhttps://geedew.com/Sharing-SSH-With-WSL/2018-04-04T12:35:49.000Z2018-10-06T15:04:18.286ZThe WSL on Windows 10 is a new tool to run Linux commands and Linux dristibutions. More to the point, Windows finally has a mostly working bash environment that works with the CLI tools developers have embraced. Just like any tool that is of use, some things must be done to set them up appropriately. Sharing SSH keys is one of those things that you need to setup to use effectively. SSH uses keys to cryptographically connect to network resources like Github.com or a DigitalOcean server. If you have done any Windows development, you likely already have a Putty or Cmder setup for SSH keys. If you have not used SSH on Windows, then sharing keys can be a moot point; as it would be easier to simply use the WSL.
WSL creates it’s own users with there own permissions and this is the real crux of the issue. This user will have it’s own access to files and it’s own setup for Git and SSH Config.
The first step within the WSL is to create an SSH config for your user that will use the Windows user’s files for keys.
1 2 3
mkdir -p ~/.ssh/config touch ~/.ssh/config # create a config only if it doesn't exist vi ~/.ssh/config #begin editing the config
Once in the Vi program (or use nano or whatever you like to edit with) enter the following config.
You must replace WINDOWS_USER_NAME with the name of the account being used in windows. Also, tell the config file the NAME_OF_KEY that you’d like to share. Usually this is id_rsa. Finally, save the new config file and then we must change it’s permissions so that Linux will allow it to be used.
1 2
chmod 600 ~/.ssh/config chown $USER ~/.ssh/config
We are also able to share known_hosts so that the servers we are connecting to are in both environments.
This creates a symlink with the Windows known_hosts for better sharing in the system.
]]>
<p>The <a href="https://en.wikipedia.org/wiki/Windows_Subsystem_for_Linux" target="_blank" rel="noopener"><abbr title="Windows Subsystem for Linux">WSL</abbr></a> on Windows 10 is a new tool to run Linux commands and Linux dristibutions. More to the point, Windows finally has a mostly working <a href="https://linux.die.net/man/1/bash" target="_blank" rel="noopener"><abbr title="Bourne Again SHell">bash</abbr></a> environment that works with the <abbr title="Command Line Interface">CLI</abbr> tools developers have embraced. Just like any tool that is of use, some things must be done to set them up appropriately. Sharing <abbr title="Secure Socke Shell">SSH</abbr> keys is one of those things that you need to setup to use effectively.<br>
ES6 Module Gotchashttps://geedew.com/es6-module-gotchas/2018-03-29T01:59:52.000Z2018-10-06T15:04:18.456ZUpdated for 2018
Now that ES6 has a finalized module definition (Right now still in draft phaseOut of draft phase!And some new ones coming.), I’ve gone through and found some of the things that stick out to me as ‘need to knows’. It’s helpful to keep these few things in mind when working with the new module syntax.
ES6 modules export bindings, not values. Exporting any primitive will be a ‘live’ value that can and will be changed by the imported module. This is much different than CommonJS or AMD behaviors.
The import of the integer isn’t a pass-by-value situation. You are actually getting a binding to the integer itself; always be aware of this as it will cause many problems when refactoring old code or in new usage as it changes how the logic works. You can read some of the discussion on this topic here.
Returning an object from a module is an anti-pattern. ES6 modules were designed with a static module structure preferred. This allows the code to be able to discover the import/export values at compile time rather than runtime. Exporting an object from a module allows for unexpected situations and removes the static compilation benefits. Take for instance this code:
The default export in this case is an object which is actually a binding, not a value. That a means that after exporting the object, different functions can be added or removed from this export, which will update the actual exported module. However, there is no guarantee that this module used in another manner will output the same added functions since you may not always require the second module from importing. This non-static style exporting is typical in a CommonJS codebase (even NodeJS exports the fs object as default like this) but it begins to break down in ES2015+ modules, especially while it’s required to transpile (Traceur or ES6-module-transpiler for instance) to use them today. You can however get the same effect by using named exports and statically importing them. This is a much more useful way of handling object exporting and importing (And also useful to see how the AirBnB lint standards deal with this)
1 2 3
import * as _ from'underscore';
_.each( x =< console.log(x) );
It’s important to note that one thing that modern libraries have done to avoid entire imports is to create smaller libraries that can be imported separately for each method. This is highly advantageos, especially for ‘tree shaking’ scenarios.
1 2
import _ from'lodash'; // NO import get from'lodash/get'; // YES!
If you will have side-effects, separate them and load them in a module with short syntax. The standard import looks something like “import something from ‘somewhere/else’;”. But what if the module you are importing isn’t actually exporting anything and only used to run code. As you move into modules, you will find at first side-effects are going to happen. For example.
1 2 3
// ... code window.myLib = lib; // ^ side effect occurs when you import this module!
The only alternative is to separate this code into it’s own module.
//init.js import sideeffects from'sideeffects.js'; import moresideeffects form 'moresideeffects.js'
But now you are having to create variables on the import statements; that is not pretty or maintainable. ES6 module syntax has a much better way of doing these imports that aren’t actually setting variables to anything. Basically, import the file without requesting the exports.
Dropping the variable from allows to import side-effects without the need to make up variable names that are equal to null.
Attempt to use import default at all times. Named exports are fine to use and part of the spec, but defaults are preferred and your code will flow better. It will encourage smaller modules that do less and will help keep your code a bit easier to test. ES6 modules prefer default exports. This was by design. It becomes a code-smell if your files begin to look like bracket central.
After a dozen of these at the top of a single file, it should become very apparent that your modules are filled with too many functions and are not properly breaking down into smaller modules. It’s not bad to use named imports, but it’s a clear indicator that if all imports are using named imports, modules are doing too much and you risk having more bugs and complexity in them. It’s a good thing to keep in mind as a leading flag of a need to refactor.
Avoid extra syntax if exporting from imports. It’s really simple to fall into this trap.
It might look ridiculous, but as you get into larger files, you may forget what’s what and where it’s coming from. You can avoid this by exporting directly from the other file.
1
export something from'somewhere/else';
Some of these are tips, some are tricks; all of them feel new and arguably different to me and it’s good to be aware of them.
]]>
<p><em>Updated for 2018</em></p>
<p>Now that ES6 has a finalized module definition (<a href="https://people.mozilla.org/~jorendorff/es6-draft.html" target="_blank" rel="noopener"><del>Right now still in draft phase</del></a> <a href="https://www.ecma-international.org/ecma-262/6.0/#sec-imports" target="_blank" rel="noopener">Out of draft phase!</a> <a href="https://tc39.github.io/ecma262/#sec-imports" target="_blank" rel="noopener">And some new ones coming.</a>), I’ve gone through and found some of the things that stick out to me as ‘need to knows’. It’s helpful to keep these few things in mind when working with the new module syntax.<br>
Remove a directory that is not empty in NodeJShttps://geedew.com/remove-a-directory-that-is-not-empty-in-nodejs/2018-03-25T04:11:32.000Z2018-10-06T15:04:18.646ZA quick pro-tip for handling this situation.
NodeJS provides an easy to use fs.rmdir command that follows the POSIX standard. This unfortunately means that it will error ENOTEMPTY if there is any file in the directory you are attempting to remove. NodeJS doesn’t have an easy way to force the removal, so you have to get fancy.
By far, the easiest, safest and most cross environment approach is to use rimraf whose source code shows nearly 250 lines of premium quality work.
Or if you must, try trash. It’s really neat too. But, if you are still reading, doing it yourself is easy and a valid option. The following is a synchronous way to handle the deletion of a directory that may not be empty.
I’ve further added an Asyncronous method for removing the directories. While it’s more code (and that means possibly brittle), and I’m afraid I haven’t battle tested it as much, it’s seemingly twice as fast in my rudimentary testing (However, all sorts of factors can affect a test like that).
var fs = require('fs');var rmdirAsync = function(path, callback) { fs.readdir(path, function(err, files) { if(err) { // Pass the error on to callback callback(err, []); return; } var wait = files.length, count = 0, folderDone = function(err) { count++; // If we cleaned out all the files, continue if( count >= wait || err) { fs.rmdir(path,callback); } }; // Empty directory to bail early if(!wait) { folderDone(); return; } // Remove one or more trailing slash to keep from doubling up path = path.replace(/\/+$/,""); files.forEach(function(file) { var curPath = path + "/" + file; fs.lstat(curPath, function(err, stats) { if( err ) { callback(err, []); return; } if( stats.isDirectory() ) { rmdirAsync(curPath, folderDone); } else { fs.unlink(curPath, folderDone); } }); }); });};
]]>
<p>A quick pro-tip for handling this situation.</p>
<p><a href="http://nodejs.org" title="NodeJS, JavaScript on the server" target="_blank" rel="noopener">NodeJS</a> provides an easy to use <a href="http://nodejs.org/api/all.html#all_fs_rmdir_path_callback" title="Remove Directory in NodeJS" target="_blank" rel="noopener"><code>fs.rmdir</code></a> command that follows the POSIX standard. This unfortunately means that it will error ENOTEMPTY if there is any file in the directory you are attempting to remove. <a href="http://nodejs.org" title="NodeJS, JavaScript on the server" target="_blank" rel="noopener">NodeJS</a> doesn’t have an easy way to force the removal, so you have to get fancy.</p>
<p><del>By far, the easiest, safest and most cross environment approach is to use <a href="https://www.npmjs.com/package/rimraf" target="_blank" rel="noopener">rimraf</a> whose <a href="https://github.com/isaacs/rimraf/blob/master/rimraf.js" target="_blank" rel="noopener">source code</a> shows nearly 250 lines of premium quality work.</del></p>
<h4 id="It’s-2018-use-del"><a href="#It’s-2018-use-del" class="headerlink" title="It’s 2018, use del."></a>It’s 2018, use <a href="https://www.npmjs.com/package/del" target="_blank" rel="noopener">del</a>.</h4><p>Or if you must, try <a href="https://github.com/sindresorhus/trash" target="_blank" rel="noopener">trash</a>. It’s really neat too.<br>
Generating Docs from Google Sheetshttps://geedew.com/generating-docs-from-google-sheets/2018-03-08T06:00:00.000Z2018-10-06T15:04:18.508ZGoogle Sheets allows for App Scripts to be ran which can provide robust, custom automatic reporting. The example outlined below may require some customization of code, but that could be made more efficient with some effort. Turning the App Script into an Add-on also allows for sharing report creation with others. An example could be running a report of expenditures from a Sheet filled with expenses. It’s possible to run a report from a Sheet so that Docs are automatically generated.
About
I was asked by my PTO to help organize a parent ran, lunch hour, fun time with the students. Planned for one day in each of 4 weeks. Parents sign up to teach students and students sign up for classes to attend during their lunch hour to stay out of the cold. Previously, the students signing up and attending one of 20 fun classes at lunch was done within Microsoft Access and was entered into a system by a single individual. While we did have all of those Access files and I’m well experienced with Access, the actual data entry was better suited within Google’s ecosystem. However there is no clear way to create reports for each student, teacher, and parent’s schedules once the data was entered. We needed to have the ability to generate reports based off of a Sheet.
Making Templates
The solution begins with creating template Docs that contain delimited words which would be replaced by cells from the Sheet. Using a simple system of delimiters like ## to define the variable words. Using left and right delimiters of two octothorpe, I created the necessary formats of the Docs that are needed. The class schedule I need contains Student data with a page per student. This allows each student to be able to have his or her schedule in there bag or for their parents to see.
It’s best to have unique and repetitive naming of the variable words. In my case, I use all uppercase character that contain no spaces and are prepended with a generic naming scope. Student data begins with STUDENT_. I also have a possibility of N sessions per student where the student may have 0 to 4 classes. I called these SESSION_N_ data to easier find and replace. Proper names make the code much easier to deal with; take care in using naming conventions.
Creating Reports using the Template
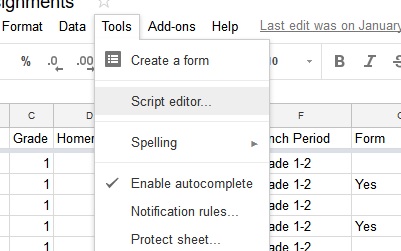
Creating reports begins with writing an App Script within the Sheet. App Scripts can be created from within your sheet by finding the Tools menus and choosing App Script Editor. Once in the editor, you can create methods that will grab the template, create a new document, run through your sheets rows and add to a new document the template filled with the data. This script does quite a bit.
At the top of the file, setting up a mapping to the Sheets cells. Doing this allows to easily update where the variable names in the Doc template matches the key in SPREADSHEET_MAPPING and the value is the coulmn in the Sheet’s row as we loop through each row.
1 2 3 4 5 6 7 8 9
/** * SPREADSHEET_MAPPING * Contains Template variables and the columns */ var SPREADSHEET_MAPPING = { HAS_FORM: 6, FIRSTNAME_CELL: 1, LASTNAME_CELL: 0, // ...
The onOpen method taps into the script editors ability to add a menu item that can be then used to run the app.
Appending to a Doc requires the code to handle what exactly is being appended. It’s best to append a single ‘paragragh’ of text or a ‘table’. This code, so keep it simple, ignores the need for handling other types.
1 2 3 4 5 6 7 8 9 10 11 12 13 14
functionappendElementToDoc(doc, object) { var type = object.getType(); // need to handle different types para, table etc differently var element = object; element = object.copy(); Logger.log('Content ' + element.getText()); if (type == "PARAGRAPH") { doc.appendParagraph(element); } elseif (type == "TABLE") { doc.appendTable(element); } else { Logger.log('erm ' + type); } }
Getting Sheet data is very simplistic. Grab the active Sheet and the active tab, and copy cells based on 2nd row, 1st column through last row and last column. It would make sense to make the beginning variables.
1 2 3 4 5 6
functiongetSpreadsheetData() { const ss = SpreadsheetApp.getActiveSpreadsheet(); const sheet = ss.getActiveSheet(); const data = sheet.getRange(2, 1, sheet.getLastRow()-1, sheet.getLastColumn()).getValues(); return data; }
Creating a document and adding a document to a folder do the bare minimum in script editor API code to move along.
Generating a student schedule; the magic. Some setup first at the top. Again it would be rudimentary to make some of this variables. We create a new document called ‘Studen Schedules’ with a timestamp here. Then we add this document to the foleder that is a variable; this is relative to the current script that is running (the Sheet you ran it from).
1 2 3 4 5 6 7 8 9 10 11 12
Logger.log('>>>'); const templateid = "1hiopIDgPiQaBQi13QPbPjka5RgE9dtAK-CBumzSi03Q"; const GENERATED_DATE = Utilities.formatDate(newDate(), "GMT", "MM/dd/yyyy"); const SESSION_1_DATE ='Thursday, February 1st'; const SESSION_2_DATE ='Wednesday, February 7th'; const SESSION_3_DATE ='Tuesday, February 13th'; const SESSION_4_DATE ='Thursday, February 22nd'; const data = getSpreadsheetData(); const newDoc = createDocument("Student Schedules - " + Utilities.formatDate(newDate(), "GMT", "HH:mm dd/MM/yyyy")); addDocumentToFolder(newDoc,FOLDER_NAME); var content = '';
Now the code must Clone the template and create a new document of the template. For performance, the code loads the new document into a variable memory.
1 2 3
var docid = DriveApp.getFileById(templateid).makeCopy().getId(); var doc = DocumentApp.openById(docid); var docbody = doc.getActiveSection();
Next is the looping through the Sheet‘s rows and pulling the content from each cell and replacing the items in the template (which we make another copy of on each loop).
1 2 3 4 5 6 7 8 9 10 11 12
for (var i in data){ var row = data[i]; // do nothing if no data or no lastname if(!row || !row[0]) { continue; } // Ignore students that don't have any signups if(row[SPREADSHEET_MAPPING.HAS_FORM] !== 'Yes') { continue; } // clone the template for injection var body = docbody.copy(); body.replaceText("##STUDENT_NAME##", row[SPREADSHEET_MAPPING.FIRSTNAME_CELL] +' '+ row[SPREADSHEET_MAPPING.LASTNAME_CELL]); // ...
Mapping the variable above in setup makes this very non-custom and easy.
1 2 3 4 5 6 7 8
// quickly loop through and update all mapped variables Object.keys(SPREADSHEET_MAPPING).forEach(function(key, index) { var value = row[SPREADSHEET_MAPPING[key]]; if(!value || value.length < 1 || value === "#N/A" || value === "None") { value = '-'; } body.replaceText('##'+key+'##', value); });
Uh oh, first major performance issue that happens. It’s very easy and possible to push too much content into the Doc at once. As the code is looping, every hundred rows it will push the content to the document and buffer some more. This is a major performance increase to the code.
1 2 3 4 5 6 7 8
Logger.log("Appending to the main document "+body.getText()); appendToDoc(body, newDoc); // add the filled in template to the students newDoc.appendPageBreak(); // batch output if((i % 100) === 0) { newDoc.saveAndClose(); newDoc = DocumentApp.openById(newDocId); }
Last, close and save the template and let the user know with the ‘toast’ notification.
Logger.log('<<<'); SpreadsheetApp.getActiveSpreadsheet().toast("Reports have been complied");
Issues Encountered
Folder paths
Folder paths are seemingly easy, but I recommend sticking with the relative paths. The issue comes into fruition when the script is shared and others have much different folder paths and depth.
It can be tricky to get performance correct. Opening and appending to documents is the most intense. Batching output is highly recommended along with caching the document in memory and making changes there.
Logging errors
Logger works, but it can be hard to find and open. I had to hop between tabs and page refreshes to debug.
Appending content
It’s actually very difficult to take text Nodes and manage them into another document. For simple single elements, like a paragraph and table, it’s easy. Recommended to use a library of code to handle any significant scripting.
Wiping the last paragraph
You can’t remove the last paragraph from document. This means if you ‘copy’ the template, it will error if it’s the last item (as that will essentially remove it!). This is why the code above is ‘cloning’ the template into memory.
Final thoughts
Google App Script is really fun. The power that exists is very nice and it’s almost thrilling to get that kind of control which allows for some really great automation that can occur. I’ll likely continue at some point finding other automation scripts I can run.
]]>
<p>Google <em>Sheets</em> allows for <em>App Script</em>s to be ran which can provide robust, custom automatic reporting. The example outlined below may require some customization of code, but that could be made more efficient with some effort. Turning the <em>App Script</em> into an <em>Add-on</em> also allows for sharing report creation with others. An example could be running a report of expenditures from a <em>Sheet</em> filled with expenses. It’s possible to run a report from a <em>Sheet</em> so that <em>Docs</em> are automatically generated.</p>
Tips to Growing a Developer Team Effectivelyhttps://geedew.com/tips-to-growing-a-dev-team-effectively/2018-02-24T06:00:00.000Z2018-10-06T15:04:18.736ZAt some point a successful engineering team will be faced with growth. Growth is a critical path that will bring stress and complications to a team. Growth is a factor for risk and making mistakes can corrupt the culture and bring a project to a halt. The following are a few tips to help avoid issues.
Teams will be made or broken by communication. If communication fails, and trust is abandonded, the team would have been better off if they hired no one.
Hiring
Having anyone is sometimes better than having no one. But having the right person is better than having the “right now” person.
Have a process.
Have at least 4 team members interview. The employee in doing the hiring should hear the opinions of the interviewers before making the choice on there own.
Document every step of the process so that it can be improved or repeated by anyone.
Ask newly hired employees to improve the process.
Create challenges that represent real work that hirees would be doing. Have the interviewee describe how they would accomplish the proposed work, and have the employees interviewing ask questions about the solutions provided.
Have a process to hiring; no really, create one today. It’s incredibly time consuming and hard to grow a team without having something of a flow of what to do when bringing in possible employees. From phone calls, to emails, and 1-1s, details get lost. Have a process to document all of these steps. Teams will only benefit by asking many team members do an interview. Time is the only limitation on how many you want to partake in the interviewing process. 3-5 hours of interiew time is typical. Anything less and the risk of hiring the wrong employee is too high. Teams should consider to have at least 2 intewviewers in the room at any time. In fact, it’s a learning opportunity for everyone in the room everytime it’s done. As a team, always stop after interviews are done and retrospect. Let opinions come out and the team decicion should become obvious. As a boss, however, take care in making a decision that isn’t necessarily what the team thinks they want, but focus on what is needed. The most important question to answer is not ‘Can this person do the job’, it’s ‘Can this person communicate within this team effectively’. It’s critical to understand that the smartest person interview is not always who should be considered. Teams work best when there is trust among the team members, so a team members’ attitude is everything. Teams need to hire those they will work best with and that can do the job, in that order. Teams will be made or broken by communication. If communication fails, and trust is abandonded, the team would have been better off if they hired no one.
On-Boarding
The simplest method taken is to place the process squarely within the mind of the new hire.
Don’t rely on other parts of the company to provide new team members direction; the team can provide that.
Teams need to have a ‘Structure’ diagram that outlines visually who has what responsibility.
Create a shadowing schedule where the a team member will peer work with other members related to what they will be doing. To this for at least the first 3 days for a new hire.
Provide a handbook, or some documentation of how work is done. Be clear on the critical decision making choices the team has made.
Managers need to have a 1-1 at the end of each day with the employee for the first week. Improving the process each day.
Create as many opportunities for success at the beginning of an employee’s employment and they will want to stay for years.
Make sure all paperwork that the employee needs to have done, is done ASAP or else it will become work that interrupts their success.
Get all 401k, health and miscellaneous employment benefits completely understood by the employee day 1, especially if there is no HR.
Communication
Teams work best when there is trust.
Teams should have ‘lightning’ talks on how work is accomplished. This is a great way to share and communicate.
Have ‘happy hour’ time with new hires to break the mold.
Give the team real training time, like ‘agile’ training or conferences or host you own.
Team leads or managers need to be having 1-1s with the employees, ideally when needed but no less than every couple weeks.
Give new hires a set of bookmarks for all the processes they are expected to work with. This is key to getting real work done.
If these tips helped you or you have more to add, find me @geedew and let me know.
]]>
<p>At some point a successful engineering team will be faced with growth. Growth is a critical path that will bring stress and complications to a team. Growth is a factor for risk and making mistakes can corrupt the culture and bring a project to a halt. The following are a few tips to help avoid issues.</p>
<blockquote>
<p>Teams will be made or broken by communication. If communication fails, and trust is abandonded, the team would have been better off if they hired no one.</p>
</blockquote>
Fixing GIT Branch and Tag Name Collisionshttps://geedew.com/fixing-git-branch-and-tag-name-collision/2018-02-12T06:00:00.000Z2018-10-06T15:04:18.476ZA basic understanding in Git is that Tags are aliases to a commit hash (A single entry in the history of commits) whereas a Branch is the name for a diverged chain of commits that share a common history and ancestor. Confusion can be had when assuming a branch is always the HEAD, or most recent, commit in the fork of the code. While this can be true, this is not what a Branch represents and may lead to Tags being used interchangeably with Branches. When Tags and Branches are both used, they give flexibility to teams to share commit history and easily communicate important changes in code, but naming them similarly will lead to collisions if not well thought out.
Take care naming tags and branches to keep from confusing Git
Assume there is a master branch of code and a develop branch of code. Daily work is in the develop branch. Moving code into a master branch creates a release-able set of code. If the team wishes to be able to maintain the release for any period of time, a Tag should be created at the point in which the code has diverged.
You should never name a tag and a branch the same name!
It makes sense in a case like this to use naming conventions on the tags to keep from colliding on the branch names.
1
2
3
git tag develop-v1.0.0 // or git tag v1.0.0-beta
Versus when we releasing code from the master branch.
1 2 3
git tag release/v1.0.0-rc1 // or git tag release/v1.0.0
You can find the common parent in git using merge-base to do a Tag on code from the past.
If the team is only using master and develop collisions with these two branches will be very rare. However, feature branches and release branches bring in much more opportunities.
How to fix when you have a collision
If a collision has occurred Git will relay that with a message like the following. Assume we have mistakenly created a Tagrelease/v1.0.0 and a Branchrelease/v1.0.0. What will happen if we tell git to ‘checkout’?
1 2 3
git co release/v1.0.0 warning: refname 'release/v1.0.0' is ambiguous. Switched to branch 'release/v1.0.0'
By default, git has chosen the Branch. If we meant to ‘checkout’ the Tag, being more specific is required.
1 2 3 4 5 6
git co refs/tags/release/v1.0.0 Note: checking out 'refs/tags/release/v1.0.0'.
You are in'detached HEAD' state. You can look around, make experimental changes and commit them, and you can discard any commits you make in this state without impacting any branches by performing another checkout.
Notice how we added refs/tags/. This is what can be found within the .git folder. The folder structure is the same that is would needed to append. We could also specify refs/heads/ if we wanted the branch.
At this point, any git command can specific enough check out any branch or tag without “ambiguity”, it’s best to rename the branch by creating a new one and deleting the previous branch; or remove and create a new tag so that the two do not have this collision.
]]>
<p>A basic understanding in Git is that <em>Tags</em> are aliases to a commit hash (A single entry in the history of commits) whereas a <em>Branch</em> is the name for a diverged chain of commits that share a common history and ancestor. Confusion can be had when assuming a branch is always the <em>HEAD</em>, or most recent, commit in the fork of the code. While this can be true, this is not what a <em>Branch</em> represents and may lead to <em>Tags</em> being used interchangeably with <em>Branches</em>. When <em>Tags</em> and <em>Branches</em> are both used, they give flexibility to teams to share commit history and easily communicate important changes in code, but naming them similarly will lead to collisions if not well thought out. </p>
<blockquote>
<p>Take care naming tags and branches to keep from confusing Git</p>
</blockquote>
Updating this bloghttps://geedew.com/updating-my-blog/2018-02-07T06:00:00.000Z2018-10-06T15:04:18.776ZEarlier in the year, the Geedew blog was going through a bit of downtime. Mostly this was caused by the incorrect installation of Wordpress settings. Geedew.com is deployed and ran with Ansible, and Wordpress was simply too much for how little is actually hosted here. Also, Geedew.com was slow and quite ugly. Not exactly amazing work for a professional web developer. The server needed to move and new things needed to be tried.
Wordpress must be removed.
Server Move
This site runs within Digital Ocean. That allows for easy maintenance and expansion. But, previously, Ubuntu 15.04 was being used and Docker really wasn’t going to work that well. Not to mention, server setup and deployment is automated with Ansible. Moving to a new DO server was a must, so Ubuntu 17.04 is now in place.
Not using Wordpress
Wordpress is fine. I even recently used it to build out Grace Bible Church Northwest and prior to this, I’ve used it on this site since… 2009?! Yeah, as a long time user and PHP developer, I was in very early on Wordpress. A few things just weren’t working out for me.
Large security surface for little gain; hard to secure
Slow, and caching was way too complicated to work with
Too much stuff I would NEVER use
Pages are too hard to grok
Constant updates to the core and plugins
Theme’ing is way too complicated to really get into it.
Long live Hexo.js
I’m really liking the simplicity and usefulness of having a static html website. Hexo, like the popular Jekyll it has a lot in common with, fit the bill of being a Node setup that I was looking for. In development, I can have a quick Node server, while in Geedew.com I’m able to have Nginx hosting the static html.
Lots more coming
I’m hoping to deliver small features over time. I’ve cut back and that allows me to work on delivering the small details in quality releases.
Auto-delivery of the site via changes on Dropbox
Updates to the landing page to include non-blog things
Experimenting with photo posts.
Image header and custom post information.
What actually changed?
Everything changed between the html tags. I was able to convert the logo to an SVG and that also meant the entire color scheme changed as well. The dates, tags, archive links were all removed. Instead, I wanted to have relative dates to get a feel for the age of a post (3 days ago, etc). Some of those will come back if and when I decide to add it. All the colors and design is new. And it will improve over time.
]]>
<p>Earlier in the year, the <a href="https://geedew.com">Geedew</a> blog was going through a bit of downtime. Mostly this was caused by the incorrect installation of Wordpress settings. <a href="https://geedew.com">Geedew.com</a> is deployed and ran with Ansible, and Wordpress was simply too much for how little is actually hosted here. Also, <a href="https://geedew.com">Geedew.com</a> was slow and quite ugly. Not exactly amazing work for a professional web developer. The server needed to move and new things needed to be tried.</p>
<blockquote>
<p>Wordpress must be removed.</p>
</blockquote>
The importance of processeshttps://geedew.com/the-importances-of-a-process/2017-08-23T11:05:10.000Z2018-10-06T15:04:18.726ZWhat’s the first step taken to any project, whether at home or at work? Is it an idea? A problem that requires a solution? A request from an associate? How is it that this project takes the next step and eventually comes to a conclusion? What is the next step?
Something comes next, or nothing gets done
In all likely-hood the process that must be taken to get to the first or next step is a know process by those asked to do it. Be it a discovery process, a design process, a development process or an organizational one. Something comes next, or nothing gets done. Processes, or the steps taken to do work, can be improved from the logical outcome of thinking and planning. Anything that has effort can be done more consistently and efficiently with a well thought out process.
How is a planned process recorded? Is it written down? Is it a set of checkboxes that are checked off as work has been completed? Can it be verbal, or simply remembered or a visual cue? Regardless of how a process is communicated, the level of communication can and will determine the impact and integrity. Without a somewhat rigid procedure, getting work done can have unpredictable outcomes with unknown efficiency. So a well thought out and practiced process tends to solidify what can be done, and when and how work will happen at what expected efficiency.
A recorded process is sometimes referred to as ‘the standard’. There may be a notation on a procedure to take in any given situation. This becomes know as the SOP, standard operating procedure. Many times the SOP is considered a learned process that is known by all workers inherently. When approaching a stop sign while driving a vehicle, for instance, the SOP is to stop and look before entering the intersection. Then a learned process is taught to all drivers on what procedure to take when there are other cars. In my experience it is almost ubiquitously known that getting a ‘wave’ from another driver means you can go, even though this is never a taught thing. This is an example of a process that occurs, but is never taught.
It is important to a team of workers to have a process that is not simply known, but one that is taught, documented and improved with regularity. The leaders of the team cannot have ‘waves’ in the process that everyone is expected to understand. New team members especially will be confused and fill fail to do their work. A good leader knows when to ‘wave’ and when to document a rule.
A team will stalemate when too many rules are applied. This can be observed within most bureaucracies. The rules are extremely organized and well documented, but so may procedures are observed in the processes that not one person can be able to understand, let alone follow them. This leads to specialists within the team; which leads to scaling issues. In fact, more procedures and processes will cause the team to lose control of what they are attempting to build. Once this happens, the work that team does will be reliant on another party in a way that impedes the team.
There is not a fine line that determines a trim from an overbearing process. There is, ironically, a process to determine if the larger set of steps within the work being done needs trimmed or grown. This is typically referred to as a retrospective. Time taken with regularity by a team to change and control a process will determine the success or failure of the team.
As a takeaway consider the team processes you’re a part of. Are they well communicated and followed up on with regularity? Can your personal processes be improved with a little bit more focus from these same tools of thought?
]]>
<p>What’s the first step taken to any project, whether at home or at work? Is it an idea? A problem that requires a solution? A request from an associate? How is it that this project takes the next step and eventually comes to a conclusion? What is the next step?</p>
<blockquote>
<p>Something comes next, or nothing gets done</p>
</blockquote>
Quick tip with Typescript, Use moduleResolutionhttps://geedew.com/hint-use-moduleresolution/2017-07-19T11:22:18.000Z2018-10-06T15:04:18.526Zhttps://www.typescriptlang.org/docs/handbook/module-resolution.html
One of the first items to not miss or be confused about when starting a typescript project is to set up the tsconfig.json to contain how to resolve the paths for inclusion in the app being built.
In my case, being reminded to use the node resolution strategy for importing from the node_modules folder was a requirement.
]]>
<p><a href="https://www.typescriptlang.org/docs/handbook/module-resolution.html" target="_blank" rel="noopener">https://www.typescriptlang.o
Using AutoHotkey with Surface Penhttps://geedew.com/using-autohotkey-with-surface-pen/2017-05-19T11:22:56.000Z2018-10-06T15:04:18.800Zhttps://autohotkey.com/
This is a scripting language designed for Windows to automate some usage. A lot can be accomplished by re-mapping the inputs. While Windows 10 does allow apps to be loaded by the surface pen, however, these can be messed up and are very limited. What if the pen’s single click was “Copy” and the double-click was “Paste”? Something like this is easily achieved with AutoHotkey.
1 2
; remap surface pen button to copy to clip-board #F20::^z
Simple mappings can be achieved with short-syntax, however the surface pen tends to have some problems with this when turing off the hotkeys. More success can be had by using the full syntax and applying the down and off state.
1
2
3
#F20::Run Onenote ; Single click, Open OneNote
#F19::Send, {Shift down}{LWin down}s{Shift up}{LWin up} ; Double click, Take a screenshot into onenote (hotkey created by onenote)
#F18::Send, {Control down}{Shift down}{Alt down}x{Control up}{Shift up}{Alt up} ; Hold button to trigger snippet tool (hotkey created within Windows)
This is the beginning of using AutoHotkey. It’s been around for many years and has thousands of options that can be scripted including mouse moving and deep Windows interactions. Check out https://github.com/dantheuber/WinTop-AutoHotKey for one of my favorite ways to keep a window on top with a transparency.
]]>
<p><a href="https://autohotkey.com/" target="_blank" rel="noopener">https://autohotkey.com/</a></p>
<p>This is a scripting language designed
Towards a single source of truthhttps://geedew.com/towards-a-single-source-of-truth/2017-03-21T10:14:28.000Z2018-10-06T15:04:18.760ZI’ve come to realize that with complexity comes a large hit to the velocity at which one can develop software. Minimizing complexities when it comes to documentation and code discovery happens to be, in my experience, critical to a team being successful when programming anything with significant lines of code. A pattern that has served me well to overcome this within a team is to always keep a Single Source of Truth (SSOT). A SSOT will give a team, for instance, a single place to find or create any documentation. If it is complicated or time consuming in any way, documentation will be out of date or non-existent. If the documentation lives in a place that allows for many unlinked and non-versioned files, then expect a very large hurdle for anyone attempting to use or update it. I believe that many open-source tools benefit from embedding the documentation into the code and using the associated ‘markdown-like’ technologies greatly due to this effect.
An SSOT can allow a lower barrier to entry to the codebase. Take the package.json that many web based teams have accepted over the last 5+ years. This is a SSOT for many things including the name of the software, its version and what packages it depends on. It can also have the correct way to test, share, update, run, build, etcetera, all clearly defined within the one convenient file. This may also be why many are choosing NPM scripts over [insert build tool of choice here].
Another SSOT is having a state within the application like redux (or countless others). Driving the user interfaces in a one-way direction, read only manner allows for much simpler logic in all the right places.
When working in code, look to minimize the sources of truth and the work being done will suddenly become much easier to manage and enjoy.
]]>
<p>I’ve come to realize that with complexity comes a large hit to the velocity at which one can develop software. Minimizing complexities when it comes to documentation and code discovery happens to be, in my experience, critical to a team being successful when programming anything with significant lines of code.<br>